
A photograph of the Canterbury Cultural Recovery Centre's main floor, taken in June 2014.

A photograph of the Canterbury Cultural Recovery Centre's main floor, taken in August 2013. There are St John's uniforms hanging from a clothes rack at the end of one of the stacks.

A photograph of the Canterbury Cultural Recovery Centre's main floor. A notice board displays information for Lyttelton Museum staff. There are St John's uniforms hanging from a clothes rack in the foreground.

A photograph of the Canterbury Cultural Recovery Centre's main floor. There are St John's uniforms hanging from a clothes rack at the end of one of the stacks.

A photograph of the Canterbury Cultural Recovery Centre's main floor.

A photograph of the Canterbury Cultural Recovery Centre's main floor.

A photograph of one of the smaller rooms of the Canterbury Cultural Recovery Centre. This room stores the Kaiapoi Museum's collection.
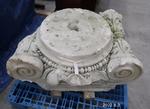
One limestone column capital, Ionic style. Leaf design on the volutes/scrolls. Salvaged during the demolition of the Cathedral of the Blessed Sacrament, Barbadoes Street, Christchurch.

One cast iron and perspex turret clock dial with two hands. Originally from the tower of the Christchurch railway station building on Moorehouse Avenue, which later became the science education centre Science Alive!

One cast iron and perspex turret clock dial with two hands. Originally from the tower of the Christchurch railway station building on Moorehouse Avenue, which later became the science education centre Science Alive!
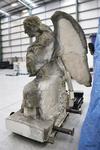
One limestone angel kneeling with left knee raised. Salvaged from atop the entrance of the Cathedral of the Blessed Sacrament, Barbadoes Street, Christchurch, before the Cathedral was demolished due to damage from the Christchurch earthquakes of 2010/11.
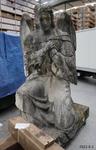
One limestone angel kneeling with right knee raised. Salvaged from atop the entrance of the Cathedral of the Blessed Sacrament, Barbadoes Street, Christchurch, before the Cathedral was demolished due to damage from the Christchurch earthquakes of 2010/11.